Working with RetSoft
Archives
When used for the first time, RetSoft Archive® opens an example archive. This archive is located in the 'Examples' folder. In Microsoft Windows Vista/7/8/8.1/10, this is 'C:\ProgramData\RetSoft Archive\Archives\Examples'.
After you have entered your license key you have the choice to either continue working with the example archive, or to create a new archive.
Creating a new archive
You can create a new archive by selecting 'File' from the menu in the main window followed by selecting on 'New archive...'.
You will get the option to create a new *.rdb archive anywhere on your PC. Enter a name for your archive and select Save.
Note: The name of your archive may not contain any of the following characters: / \ : * _ | "
Opening an existing archive
From the 'File' menu, select 'Open archive...' and browse to the location on your computer or network where you have placed your RetSoft Archive.
Previously opened archives are more easily available under 'File', 'Recent archives' in the order they have been opened last.
Finding a lost database
It is important to remember the location and name of your databases. In case a database is lost you can search for it in Microsoft Windows by searching for '*_*.rdb' (without the quotes).
After the search has completed a list of databases should be visible. Start RetSoft Archive and select 'File', 'Open archive...' and browse to the location fo your archive (*.rdb file).
IMPORTANT
Each archive consists of a database file (*.rdb).
When using multiple archives it is adviced to save archives in the same location so that you can find them when reinstalling RetSoft Archive or creating backups.
The use of multiple archive files can sometimes be preferred to separate file types.
It is highly adviced to make backups of your archives, and save said backups on different hard disks or network drives.
Do not rename *.rdb files manually.
Do not put your archives in a synchronized folder like Microsoft OneDrive or Dropbox, this can cause corruption in your archive files as well as create safety concerns.
Compatibility
RetSoft Archives are not backwards compatible, this means that newer archives cannot be run by earlier versions of RetSoft.
Earlier versions of archives can be converted to newer versions using conversion tools (Available under RetSoft in the Microsoft Windows start menu).
Folders
RetSoft Archive supports folder structures to keep your documents more organised, it can be used as a digital filing cabinet.
Correctly naming and structuring your archives folders can keep your archive ordered and the maintains the high performance of RetSoft Archive.
We advice not to place more than 1000 documents in one folder.
Created folders are virtual folders inside your database file. They are not real folders on your harddrive and therefor cannot be found using Microsoft Windows.
Selecting the 'New Folder'  button will make the following window appear:
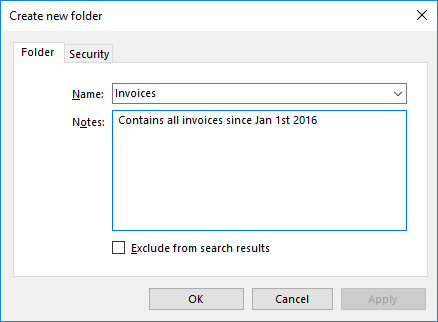
Enter a name for your folder in the top field (128 characters or less).
In the notes field you can enter more detailed information for your folder, this can later be used to find your folder more easily as this data is considered during a search.
By checking 'Exclude from search results' you can tag this folder to be ignored during searches.
Select OK to create the folder, the newly created folder will now be the selected folder.
Note: it is also possible to create sub folders. To do so, make the new folder active, and select 'New folder' again.
We advice not to create more than 255 folders in one folder.
Setting access rights
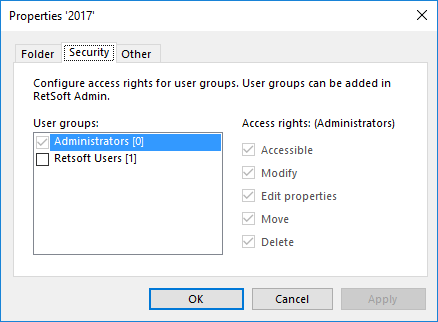
When using RetSoft Archive 'Expert' or 'Business+' an extra tab 'Security' is visible while creating a folder or when right clicking a folder or document and selecting 'Show properties...'

This options make it possible for administrators to set access rights for specific usergroups on specific files and folders.
An administrator can for example make a selection of documents, and assign only 'read-only' (accessible) rights for one group while assigning 'read / write' (modify) rights for another group.
More information on groups can be found under 'Managing users and groups' in 'RetSoft Admin'
The following access rights can be assigned to usergroups for this specific folder here:
- Accessible - Users in groups with this right may see the files or folders.
- Modify - Users in groups with this right may modify, scan and import files or folders.
- Edit properties - Users in groups with this right may edit the properties of files and folders.
- Move - Users in groups with this right may move files and folders to other folders where they have this right.
- Delete - Users in groups with this right may delete this file or folder.
Access rights are inclusive, this means that if a user were to be in three groups and only one of these groups had the access right 'Accessible' assigned to a folder, the user can view this folder.
These settings can be set by selecting a group and then selecting the desired accessibility rights.
Settings are saved by selecting OK
The inbox
An inbox is a folder within RetSoft, called "Inbox" which is linked to a folder on your harddisk or local network. When files are placed into the physical folder on your harddisk or network, they will be imported automatically (moved) into the linked folder in within RetSoft.
An inbox operates as follows: you place one or more files in the linked folder. Each time RetSoft is started, or when you right click on the inbox in RetSoft, your inbox is checked for new files which will be imported automatically. Most file formats are supported, such as scanned documents in TIFF, JPG, JPEG and PNG format, but also office documents, text files, PDF's and many more. This feature is also very useful when you use the "Save as..." option from other software programs, or when using a so-called multifunctional or a network scanner that can save documents to the linked folder.
It is important to remember that you cannot rename, delete or move the inbox.
Setting up the inbox
Users will automatically be assigned an inbox folder in RetSoft Archive.
However the users will have to link it to a folder inside Microsoft Windows first by using the settings (button  ) window, using the first tab 'Archive'.
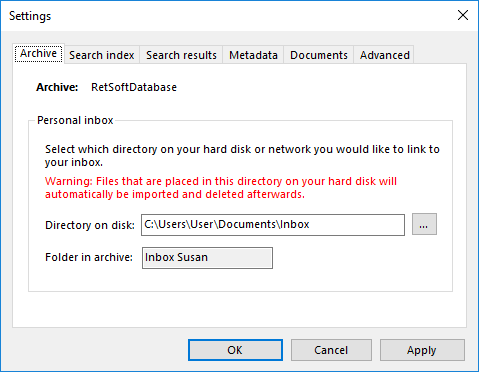
Simply select a folder on your PC and select OK, the folder on your PC will then be linked to the inbox.
Or the administrator can link the inbox for the user using the RetSoft Admin.
Import from inbox
When placing files in an inbox, the corresponding folder in RetSoft will blink with an arrow icon to notify new items have been found. After selecting the inbox the user will be prompted if they want to import the new files, select "YES" to import the files.
By right clicking on the inbox folder in the foldertree you can also mannualy check your inbox for new files with the option "Check inbox". Files will be automatically imported. Almost all files are supported, but a few types such as system files are not. Unsupported files are left in the inbox folder on your hard disk. You can manually move or delete these files.
Disabling the inbox
Disabling an inbox will turn the corresponding RetSoft Archive folder into a regular folder.
An inbox can be disabled by using RetSoft Admin.
Log in and go to the tab 'Users', then select the subgroup 'Inboxes'.
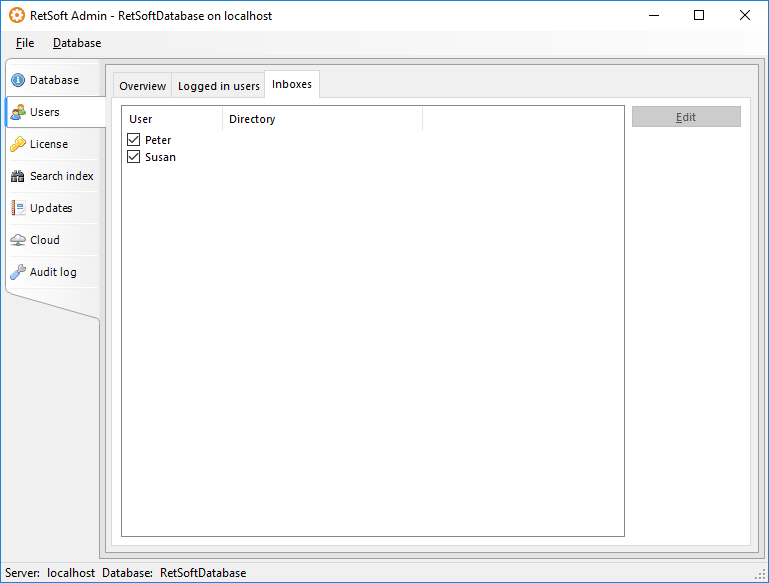
Here you can disable an inbox by unchecking the inbox for the user.
You can also simply unlink the inbox by removing the path.
Scanning and importing documents
There are several ways in which you can import items into RetSoft Archive.
Scanning documents
Open the folder to which you wish to add the documents and then select the 'Scan' button  or use the spacebar hotkey to open the following window:
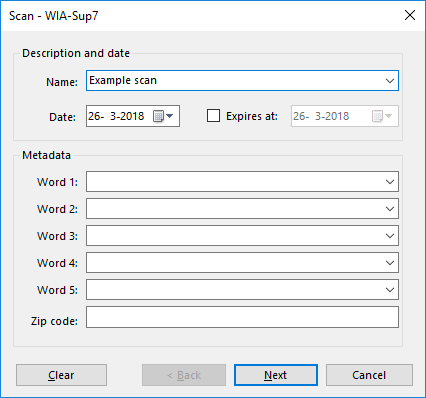
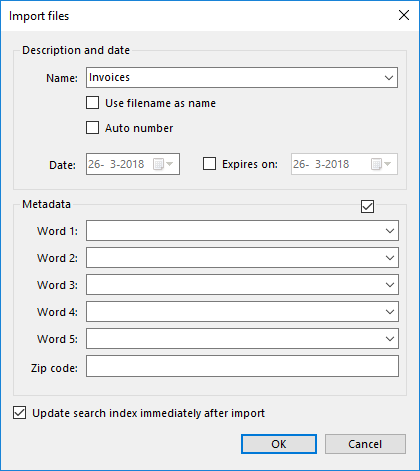
Enter a name for the documents you are about to scan (128 characters or less).
Alternatively, you can also use the 'Scan with the same name' option which is available if you click on one of the documents in the document list in te lower left corner of the main window.
This option copies the name of the selected document into the 'Name' field of the new session window.
If you have entered predefined keywords in the 'Settings' window, you can select them by using the 'pull-down' buttons at the right of each field.
In order to be able to easily find your documents you can apply OCR which makes them searchable by content.
Extra keywords can be added to the documents in this step. The keywords you set will be added to all the documents (pages) you scan in this session.
You can also change the date (the current system date is used by default) and optionally set an expiration date.
Press Next to continue to the following screen:
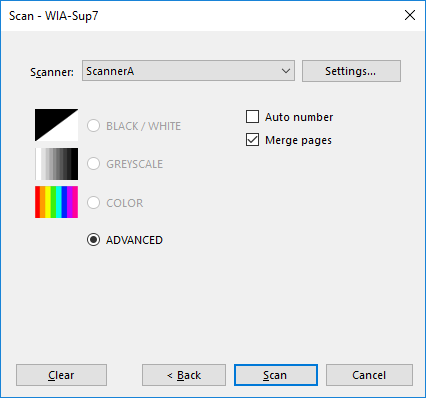
These are the settings that will apply to your scan session.
You can choose the following scan options:
- BLACK AND WHITE - Recommended as this setting has several advantages compared to other modes. It has the best result when printing, the smallest size, best OCR results and fastest loading times.
- COLOR - This setting can be used when the color preservation of a document is important such as when scanning articles from magazines or identifiaction.
- GREYSCALE - This setting has the same disadvantages compared to BLACK AND WHITE that color has.
- ADVANCED - Use this option in order to use special (advanced) features of your scanner, or when your scanner does not respond to the predefined modes.
- Auto number - Check the 'Auto number' option if you want to number your scanned documents.
- Multipage documents – Select this option if you want to combine all the scanned pages into one single document (when for instance scanning a letter that exists out of multipage pages). If you want to scan multiple files at once, you can use separator sheets.
Guidelines
Color and greyscale are scanned on an average quality (150 to 200 DPI), and at 8-bit (256 colors).
Black and white should be scanned at high quality (300 DPI).
ATTENTION: If your scanner does not respond to the BLACK AND WHITE, COLOR or GREYSCALE mode, select the ADVANCED mode.
Some manufacturers build drivers that do not fully comply to the TWAIN-standard which can cause problems when scanning with one of the predefined modes.
Upon selecting settings the following window will appear:
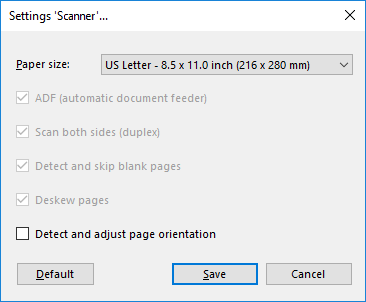
You can change the following settings:
- Paper size – Paper size of the documents you are scanning. Useful when scanning photos (A5/A6).
- ADF – Automatic Document Feeder. Use this option when your scanner has an ADF and you are scanning more than one page. If you use a scanner that has both a flatbed option and an ADF, use this option to switch between them.
- Duplex (Scan both sides) – Scan both sides of a each page in your document (if your scanner supports this).
- Detect and skip blank pages – This option detects and skips blank pages while scanning. Especially useful when combined with the Duplex. This combination will save all pages that contain information, both front and back side.
- Deskew pages – Use this option to correct skew.
The above settings are saved by RetSoft Archive on a scanner specific level. This means that you don't have to change or verify them before each scan session.
If you have changed these settings you can choose to reset them to 'Default' when needed.
Select 'Scan' (or next when OCR) is enabled).
If OCR is enabled you will get a window which allows you the choice to enable OCR after scanning.
Scanning with an MFP or network scanner
Scanning documents with an MFP (multifunctional device), copier or network scanner is also possible with RetSoft Archive.
If the device has a TWAIN driver you can even scan directly from RetSoft Archive. Direct scanning is explained above.
Configuring the device
In order to use a MFP, copier or network scanner, you need to configure the device to store the scanned documents in a shared folder somewhere in the network.
This folder will be attached to RetSoft Archive's inbox.
RetSoft Archive supports PDF and nearly all types of common graphical file formats. We advise you to scan as much as possible in black and white TIFF's (type FAX G4) with a resolution of 300 DPI.
Color and greyscale should be scanned at 150 to 200 DPI and saved as JPEG. You can consult the manual that comes with your scanning device for more information about its configuration.
Importing files
Besides scanning documents, you can also import files. You can import nearely all types of files.
HTML, MS Office, text and PDF documents can be viewed inside RetSoft Archive's viewer. Other types of files will opened in their associated programs.
To import files such as office documents or PDF's, scans or images, press the 'Import' button  (hotkey Ctrl + Space).
In the window that appears you can select the files you for import. Use the Shift/Ctrl keys to select multiple files.
Once you have selected the files, select Open to continue:
 c
c
The import window is similar to the scan window, with some additional options.
You can choose to use the filename (128 characters or less) as the documents name inside RetSoft Archive, and enable automatic numbering from here.
You can also choose to update the searchindex immediately after scanning.
Note: If 'Use filename as name' is checked and filenames contain more than 128 characters importing might not work correctly.
You can also use an inbox to import files.
Archiving email
RetSoft Archive provides the option to archive and show emails from all most common email clients.
For some of the more popular clients an add-in is provided that can be installed during the installation of RetSoft Archive.
Currently these clients are Microsoft Outlook 2003, 2007, 2010, 2013 and 2016, and Mozilla Thunderbird.
Emails are archived with the attachments included.
When possible they will also be searchable through content with help of the OCR Add-on.
Tip: You can simply drag and drop emails from Microsoft Outlook into any Microsoft Windows folder.
Import using add-ins
With add-ins you can copy the email(s) you select directly from the mail client into RetSoft Archive's inbox.
When using Microsoft Outlook you will find the link to the add-in in the application's menubar. The example below refers to Outlook 2016:
[IMAGE]
When using Mozilla Thunderbird, you can find the add-in by right-clicking on the selected email(s).
The menu that appears shows an option 'Archive with RetSoft Archive'.
Choose this option to start the add-in. Thunderbird also allows you to place a shortcut (button) into its toolbar.
Right-click on the toolbar and choose 'Customize'. The window that appears contains a RetSoft Archive icon, drag this icon onto the toolbar and click 'OK'.
More information about this can be found in the help content of Mozilla Thunderbird.
After you started the add-in, the window below appears in order to confirm the destination folder to send the files to. Once you have done this click 'Finish' in order to complete the export.

If there is no add-in available for your mail client, most clients provide a 'Save as...' option that allows you to save the emails.
Select an email you wish to archive, select the 'Save as...' option and browse to the folder that is linked to RetSoft Archive's inbox (or import the file using other methods).
Refer to Inbox for more information.
Archive from Microsoft Windows
You can archive directly from Microsoft Windows by selecting a file (or multiple files) with your right mouse button and selecting 'Add to RetSoft Archive'.
Select this and choose your target folder inside RetSoft Archive.
You can also simply drag and drop files from Microsoft Windows to RetSoft Archive and vice-versa.
Just select several RetSoft Archive supported documents and drag them to a folder inside RetSoft Archive and the import process will start.
Archive from other applications
With the RetSoft Document Printer you have the possibility to archive from different programs when these programs have an option to print files.
You can start the RetSoft Document Printer by issueing a print assignment. Select 'RetSoft Document Printer' from the list of printers and start printing your file, the following screen will appear:
Much like when using the other options you can select a folder inside RetSoft Archive in this window, and import files into RetSoft.
Processing Rules
A processing rule defines an action that is executed when an imported or scanned document matches the conditions you specify. You can use the 'Wizard processing rules' to configure your processing rules.
You can start the wizard from the toolbar button  or the menu 'Extra' in RetSoft Archive when an Inbox is selected. You can then edit, add, disable or remove processing rules.
This will open the following screen:
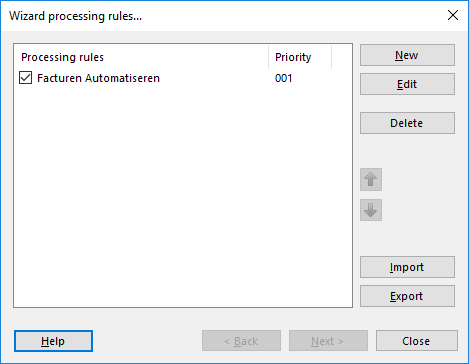
When you have one or more processing rules you can choose to edit or delete them.
It is also possible to rearrange processing rules by moving them up or down in the list, this will specify the order in which they are executed.
It is possible to backup your processing rules using the 'Export' option so you can 'Import' them again later when needed.
Creating a processing rule
Selecting 'New' will allow you to create a processing rule in the following screen:
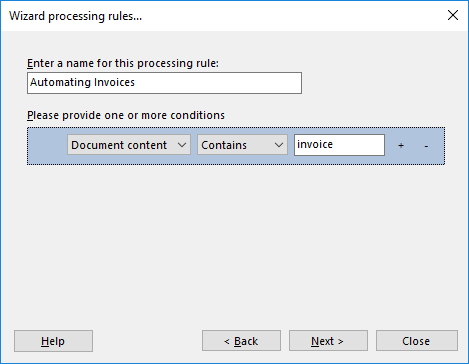
Here you can enter a name for your processing rule, and add conditions.
You can combine the conditions 'Document content' or 'Document name' with the conditions 'Contains' or 'Does not contain' followed by the word or string you want to apply these conditions to.
You can add more conditions to one processing rule by pressing the '+' button.
Note: Selecting 'Edit' will allow you to edit the processing rules using the same screen.
By selecting Next you will get the following screen:
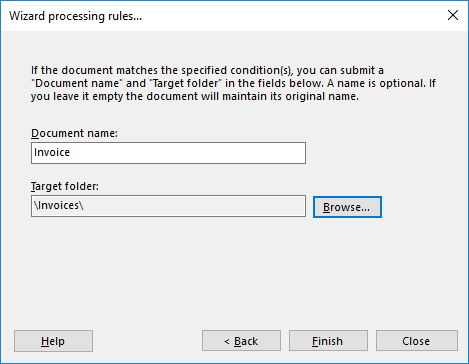
Here you can specify a name that documents matching this condition will be renamed to, and a folder in which to put the matched documents.
Selecting Finish will add the processing rule to your processing rules list.
Using processing rules
Exporting documents
Like importing, there are several ways to export items out of RetSoft-Archive too.
As email
RetSoft Archive can send emails directly from within the application. All that is required is a MAPI compliant mail client.
Select the document(s) you want to send by email from the search result or the documents list, and click the email button  to open your mail client's dialog.
By default, RetSoft-documents are converted into PDF before they are attached to the email. In order to send them as graphical documents, you can change this in the settings window.
In addition to sending an entire document you can also mail a selection of a graphical document via email.
You can do this by making a selection and selecting the 'send selection by email' button  .
.
As fax
When a fax-printer is installed documents can be faxed from within RetSoft Archive. Use the standard print button  to begin.
Then choose your fax-printer from the list of printers.
Printing
Of course you can also export a file directly to a printer by selecting the print button .
If you wish to print multiple documents at once select them and click the print button.
Exporting
The export button  offers you the option to save one or more selected documents to your hard disk as regular files.
After you have exported the documents you can use them how you would regularly.
When you select more than one RetSoft-document they will be stored into one multipage TIFF file.
You can also export RetSoft-documents to PDF files (button  ), and you can export your files with the OCR Add-on.
In addition to making your archive searchable the OCR Add-on also gives you the option to make PDF's searchable during export and convert RetSoft-documents into Microsoft Word files (button ).
Dragging and dropping
You can also simply drag and drop files from RetSoft Archive to Microsoft Windows and vice-versa.
Just select several documents in RetSoft archive and drag them to a folder inside Microsoft Windows to start the export process.
Properties
The properties (metadata) of folders and documents can be viewed and edited when needed.
Documents
To every document in the archive different properties can be assigned. These properties consist of a name, different keywords, a zip code, a date and optionally an expiration date.
By setting these properties, documents can be found more easily.
You can change the description of each property in the settings window.
The properties of a selected document can be obtained by using the toolbar button  (hotkey CTRL + E)
The following window will appear:
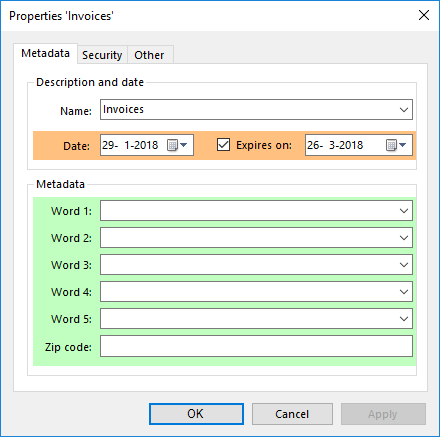
In this window you can view or change the properties of the selected document.
You can set its name as well as its metadata, date and expiration date.
The second tab lets you set its security and access rights when using RetSoft Archive 'Expert' or 'Business+'.
More information can be found here.

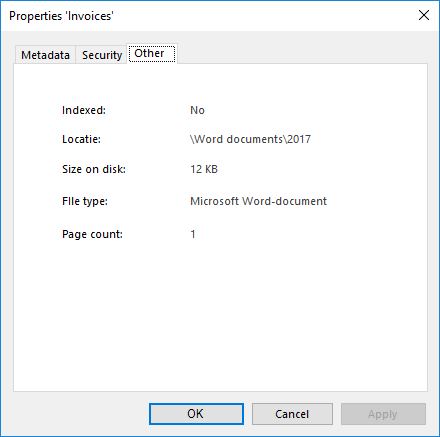
And the third tab shows you information about the document in question.
Folders
Folders have less properties than documents, mainly a name and notes field:
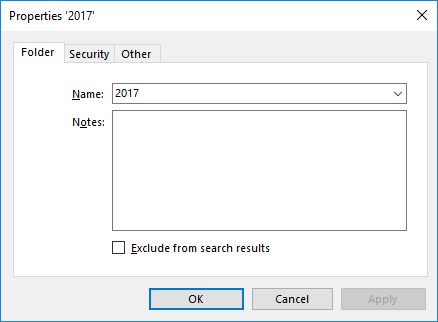
In addition you can set a folder to be excluded from search results.
The second tab lets you set its security and access rights when using RetSoft Archive 'Expert' or 'Business+'.
More information can be found here.
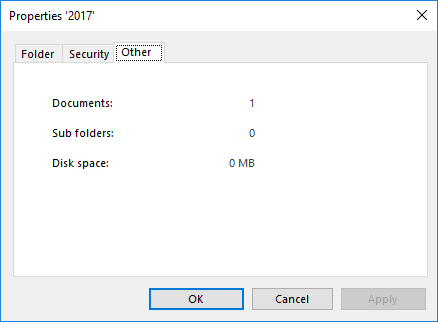
And the third tab shows you information about the folder in question.
Trash bin
To delete a document or a folder, select the item you want to delete and click the delete button  (hotkey Del) on the toolbar.
A confirmation dialog will appear. Press Yes to delete the selected document.
If you want to delete more than one document at once, use the 'Shift' and 'Ctrl' keys to extend your selection.
If a document has been deleted it is not completely removed from the archive yet as it is moved to the trash can instead.
You can access the trashcan throught the menu 'File' and then select 'Trashcan'. The menu item already displays the amount of documents inside the trashcan.
Upon selecting the following screen will appear.
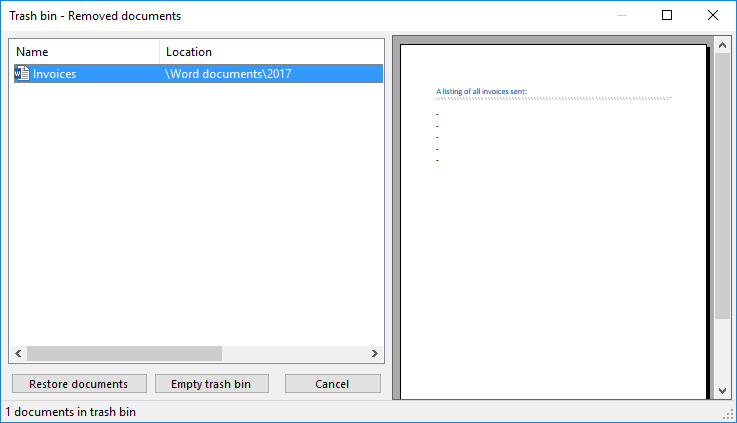
You can see a preview of the deleted item here.
If you ever accidentally remove a document it can easily be restored by clicking 'Restore selection'. To definitely remove all deleted items you can click 'Empty trashcan'.